How Tone and Probe Works
A tone generator (also called a toner) connects to one end of a cable and injects an audible-frequency signal onto the conductors. An amplifier probe (also called an inductive probe or wand) is a handheld device with a speaker that detects the tone signal without making physical contact with the cable. You hold the probe near the cable, and when it is close to the cable carrying the tone, you hear the signal through the probe's speaker.
The tone generator produces a distinctive warbling or continuous tone that radiates outward from the cable as electromagnetic energy. The probe picks up this radiated energy inductively -- no need to strip insulation or make a direct connection. This means you can trace a cable through walls, above ceiling tiles, and through cable bundles by listening for the tone as you move the probe along the cable path.
Step-by-Step: Tracing a Cable
Step 1: Disconnect the cable from active equipment
Before applying a tone signal, disconnect the cable from any active network equipment (switches, patch panels connected to switches, or PoE sources). The tone signal can interfere with network traffic, and some active equipment generates noise that makes the tone harder to detect. If you cannot disconnect the cable, use a tone generator designed for live networks that injects on unused pairs.
Step 2: Connect the tone generator
Clip the tone generator to the cable. Most tone generators have an RJ45 jack for direct connection to patch cables or wall jacks, plus alligator clips for bare wire connections. For Ethernet cable, plug the RJ45 connector into the jack at the end of the cable you are starting from. Select the tone pattern -- most generators offer a continuous tone and one or more warbling patterns. The warbling pattern is easier to distinguish from background noise.
Step 3: Set the probe sensitivity
Turn on the amplifier probe and adjust the sensitivity (volume). Start at a medium setting. Too high and the probe will pick up tone from adjacent cables, making it hard to isolate the correct one. Too low and you won't hear the tone through drywall or above ceiling tiles.
Step 4: Trace the cable path
Hold the probe tip near the cable and move along the expected path. The tone will be loudest when the probe tip is directly over or touching the target cable. As you move the probe away from the cable, the tone gets quieter. Use this loudest-point technique to follow the cable through walls, across ceilings, and through cable trays.
When tracing through drywall, hold the probe flat against the wall surface. The tone will be detectable through standard drywall (1/2 to 5/8 inch). Through concrete, brick, or metal conduit, the signal is significantly attenuated and may not be detectable.
Step 5: Identify the cable at the far end
At the far end -- the patch panel, cable bundle, or wall jack where you need to identify the cable -- sweep the probe across each cable. The cable carrying the tone will produce the strongest signal. Touch the probe to each cable individually and compare the tone volume. The correct cable will be noticeably louder than its neighbors.
In dense bundles, you may need to reduce the probe sensitivity to narrow the detection range. At lower sensitivity, you must be touching or nearly touching the correct cable to hear the tone, which makes identification in tight bundles more precise.
Step 6: Verify with a wiremap test
Once you have identified the cable by tone, confirm with a wiremap tester. The tone gets you to the right cable. The wiremap test proves it. This two-step process eliminates the possibility of identifying an adjacent cable that was picking up bleed-over tone from the actual target.
Tips for Better Results
- Use the warbling tone pattern. A warbling tone (alternating pitch) is much easier to distinguish from electrical noise, HVAC hum, and other background sounds than a continuous tone.
- Reduce sensitivity when identifying in bundles. In a tray with 48 cables, a high-sensitivity probe will pick up bleed-over from adjacent cables. Lower the sensitivity until you can only hear the tone when touching or nearly touching the correct cable.
- Tone on one pair, not all pairs. Some tone generators let you select which pair(s) to tone. Toning on a single pair reduces the radiated signal, which can help with precision in dense environments. However, single-pair toning also reduces the range, so use all-pair toning for long-distance tracing through walls.
- Watch for phantom tone on bundled cables. In tightly bundled cables, the electromagnetic field from the toned cable can induce a weaker signal on adjacent cables. This is phantom tone. It is always quieter than the real tone, but in a tight bundle, the difference can be subtle. Reducing sensitivity helps separate real from phantom.
- Shield your probe tip. Some probes have a shielded or filtered tip mode that reduces sensitivity to radiated noise and focuses on the signal directly at the tip. Use this mode in electrically noisy environments (near fluorescent lights, motors, or power cables).
- Mark cables as you identify them. If you are identifying multiple cables in a bundle, label each one immediately after identification. Do not rely on memory or position to keep track.
Free Cable Tracing Field Checklist (PDF)
A printable one-pager that walks you through every tone-and-probe job: the pre-tone safety check, sensitivity settings for bundles vs. walls, the phantom-tone test, and the wiremap-verify step. Keep it in the truck so nothing gets skipped on the jobsite.
When Tone and Probe Is Not the Right Tool
Tone and probe is excellent for cable identification and short-distance tracing. For some tasks, other tools are more appropriate:
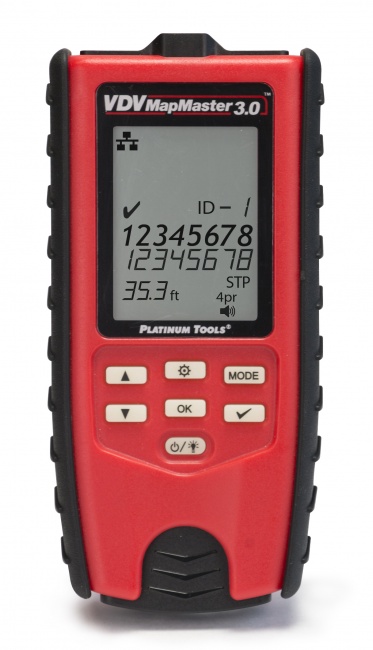
- Identifying cables in a numbered sequence: If you need to map 48 cables from a patch panel to their outlets, a cable ID kit with numbered remotes is faster than toning each cable individually. The VDV MapMaster 3.0 supports ID remotes for this purpose.
- Finding cable faults: A tone generator cannot tell you where a cable is damaged. For fault location, you need a TDR (Time Domain Reflectometer) that measures distance to opens and shorts.
- Tracing cable through metal conduit: Metal conduit shields the tone signal. The probe cannot detect the tone through metal pipe. In this case, you need to trace the conduit visually or use a fish tape with a tone transmitter.
- Tracing active network cables: If the cable must remain connected to live network equipment, standard tone generators can disrupt traffic. Use cable ID methods that do not require toning, or use a tone generator with a live-network-safe mode.
Recommended Tone and Probe Tools
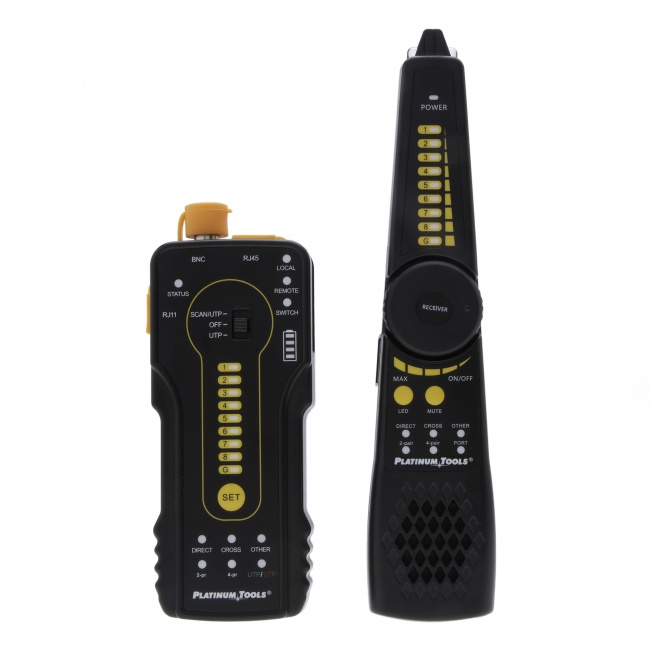
Platinum Tools Tone & Probe Set
Professional-grade tone generator with RJ45 jack, alligator clips, and multiple tone patterns. Paired amplifier probe with adjustable sensitivity and filtered tip. The standard field kit for cable tracing. View tone generators
VDV MapMaster 3.0
Combines wiremap testing, tone generation, and cable ID in one device. Generate a tone from the MapMaster and trace with a separate probe, or use the ID remotes to map numbered cables. View product
Net Prowler
Full network-aware tester with integrated tone generation. Wiremap, cable length, PoE detection, network diagnostics, plus tone output for cable tracing. View product
Frequently Asked Questions
Can I use a tone generator on a live network cable?
Standard tone generators should not be used on cables connected to active network equipment. The tone signal can interfere with data traffic, and the equipment's own signals can make the tone difficult to detect. Some tone generators have a live-network-safe mode that injects on unused pairs or at frequencies that do not interfere with Ethernet. Check your tone generator's specifications before toning a live cable.
How far can I trace a cable with a tone generator?
Most tone generators can put enough signal on a cable to trace it for 300 meters (1,000 feet) or more through open air. Through walls, the practical range depends on wall material and thickness. Standard drywall allows tracing up to about 15 meters (50 feet) from the generator. Metal conduit blocks the tone signal almost entirely.
Why does my probe pick up tone on the wrong cable?
This is phantom tone -- the electromagnetic field from the toned cable inducing a signal on adjacent cables. It is most noticeable in tightly bundled cables with the probe at high sensitivity. Reduce the probe sensitivity until you can only hear the tone when the probe is in direct contact with the cable. The correct cable will always produce a stronger signal than its neighbors.
Get the Cable Tracing Field Checklist
The same printable safety-and-sequence checklist linked above — pre-tone disconnect, sensitivity tuning, phantom-tone test, and wiremap verify. Drop your email and we'll send the PDF.
Related Guides
- How to Test a Cable with a Tone and Probe — the quick-start walkthrough.
- How to Find a Cable Fault Fast — when tracing isn't enough and you need a TDR.
- How to Perform a Cable Continuity Test — verify the cable once you've found it.
- Best Tone and Probe Kits of 2026 — our tested picks by budget.
Not Sure Which Tone & Probe Kit Fits Your Work?
Tell us what you trace — bundles, walls, security cable, or live networks — and we'll point you to the right kit instead of the most expensive one. Most installers who call leave with the correct tool and money still in their pocket.