The Short Version
What Counts as a Small Office Install
For the purposes of this checklist, a small office network install has the following characteristics: 10 to 50 drops, single floor or single tenant suite, Cat5e or Cat6 horizontal cable, 1 Gigabit or 2.5 Gigabit target speeds, no formal TIA-568 certification clause in the contract, and a client who needs the network to work reliably but does not have a dedicated IT director writing detailed test specs.
This is the bread-and-butter of most low-voltage contractors: dental offices, real estate firms, accounting practices, small medical clinics, retail back-offices, coworking spaces, and professional services. The work happens fast, the budget is tight, and the client expects a working network the morning they move in.
The failure mode on these jobs is not insufficient certification rigor -- it is incomplete testing that misses a split pair or a miswired jack and turns into a callback two weeks later when a printer stops working. Catch every defect during install, document what you tested, and the client never has to call you back.
The Pre-Test Checklist
Before you start testing, confirm the following items are in place. Skipping any of these creates ambiguity in your test results and uncertainty in your final documentation.
1. Cable schedule complete
Every drop should have a unique number that appears at both ends of the cable. The patch panel port should be labeled with the same number as the keystone jack at the workstation. Without consistent labeling, your test results document orphan cables that nobody can find six months later.
2. Patch panel terminated and dressed
Every cable should be terminated on the patch panel, the cable bundle dressed and tied, and the panel labeled. Loose untermianted cables are not testable and create the temptation to "test it later" -- which usually means never.
3. Keystone jacks installed at workstations
Each drop should be terminated into its keystone jack, mounted in the wall plate or surface mount box, and the wall plate installed. Test from a finished installation, not a dangling end.
4. Equipment list confirmed
You need a wiremap-capable cable tester, a speed certifier or qualification tool for throughput validation, a tone generator for cable tracing if labels are missing or unclear, and patch cables for connecting your tester to the patch panel. The minimum kit:
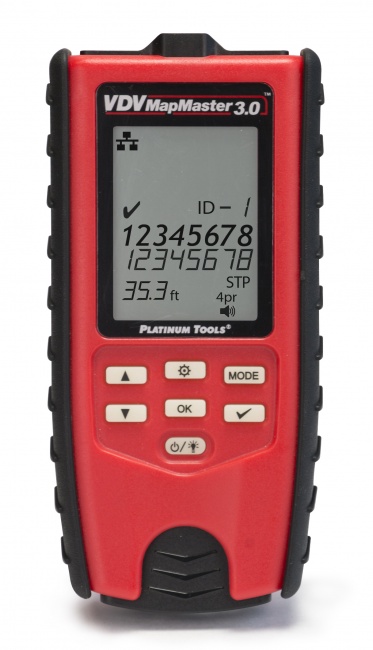
- VDV MapMaster 3.0 -- wiremap, length, split pair detection, cable ID
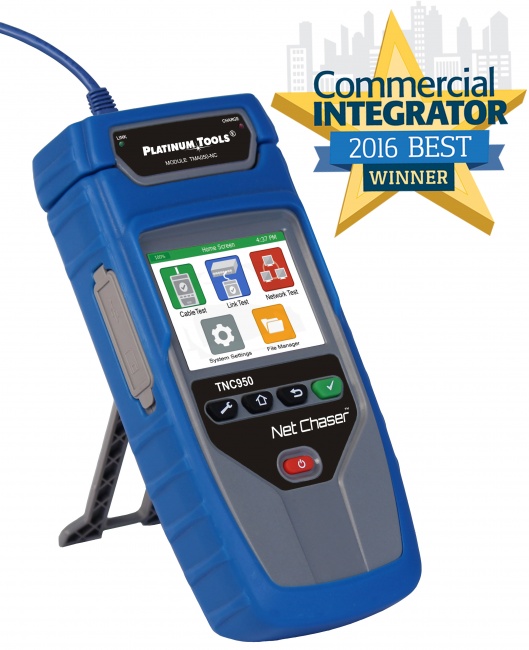
- Net Chaser -- speed validation up to 10 Gbps with PDF reports
- Digital Tone Probe -- for tracing unlabeled cables
- Two known-good Cat6 patch cables (test these first to verify they pass)
The Per-Drop Test Sequence
Follow this sequence for every drop. Doing it the same way every time prevents skipped steps and produces consistent documentation.
Step 1: Wiremap and continuity
Plug the main unit into the patch panel port and the remote into the keystone jack. The tester should report all 8 conductors connected pin-to-pin per the T568B (or T568A, whichever standard you used) wiring. Look for: opens (a conductor not connected), shorts (two conductors connected together), miswires (pins connected to wrong pins), reversed pairs (a pair connected to wrong pair positions), and split pairs (the wiremap looks correct but the actual twisted pair relationship is wrong).
Split pair detection is the single most important capability your tester needs. A cable with split pairs will pass an LED wiremap test perfectly while failing to support Gigabit Ethernet because of crosstalk. The VDV MapMaster 3.0 detects split pairs by analyzing the relationship between conductors within each pair, not just pin-to-pin connectivity.
Step 2: Length measurement
The tester should report the cable length, typically in feet. Compare against your expected length from the cable schedule. If a 60-foot scheduled run measures 95 feet, you have a longer cable path than planned (probably extra ceiling routing) -- not a problem unless you are approaching the 100-meter (328 ft) channel limit. Short cables that measure shorter than expected are usually fine. Cables measuring less than 5 feet may indicate an open near the far end (the tester is reading the distance to the break, not the full length).
Step 3: Throughput validation
Connect the speed certifier between the patch panel and the keystone jack with a known-good patch cable. Run the speed test at the target rate (1 Gbps for typical office work, 2.5 or 5 Gbps if the client is deploying Wi-Fi 6E or Wi-Fi 7 access points). The tool sends real Ethernet frames through the cable and measures actual data transfer. A pass means the cable can carry data at the tested speed -- the question your client actually cares about.
The Net Chaser generates a PDF report per drop showing the test parameters and pass/fail result. Save these for your final documentation package.
Step 4: PoE verification (if applicable)
If the drop will power a PoE device (IP phone, wireless AP, IP camera), verify PoE is present and at the correct class. Confirm the switch port is configured to deliver PoE and that the cable correctly carries the voltage.
Step 5: Document the result
Record the drop number, length, wiremap result, throughput result, and any notes (e.g., "drop 14 measured 87 ft, longer than scheduled 60 ft due to ceiling rerouting around HVAC"). Move to the next drop.
Recommended Equipment by Office Size
| Office Size | Recommended Kit | Approx. Cost | Test Time |
|---|---|---|---|
| 5-15 drops | VDV MapMaster 3.0 only | ~$160 | 30-60 min |
| 15-30 drops | MapMaster 3.0 + Net Chaser | ~$860 | 1.5-3 hr |
| 30-50 drops | MapMaster 3.0 + Net Chaser + Tone Probe | ~$960 | 3-5 hr |
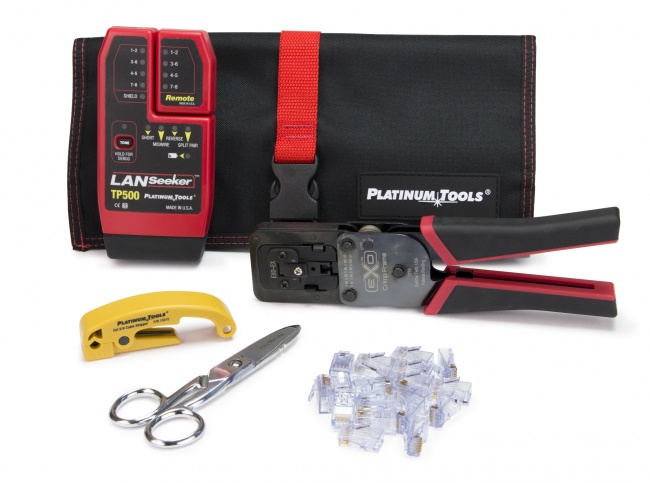
| 50+ drops | Add LanSeeker for cable ID at scale | ~$1,500+ | 5-8 hr |
| 10G or warranty cert | Rent or own a full TIA certifier | $8K-$15K (own) | +50% per drop |
Common Defects and Their Causes
After hundreds of small office installs, the failures cluster around the same handful of root causes. Knowing what to look for accelerates troubleshooting.
Split pairs
Almost always a termination error at the keystone jack. The installer punched the conductors in the wrong order on the punch-down block, swapping conductors between pairs. The wiremap shows correct pin-to-pin connections because the swap mirrors at both ends, but the twisted pairs are no longer twisted as designed. Re-terminate the offending jack following the color code printed on the keystone label.
Length mismatch
A measured length significantly shorter than scheduled usually means an open conductor partway down the cable -- the tester reports distance to the open. Use a TDR-capable tool to confirm the fault location, then re-pull or re-terminate as needed. A length significantly longer than scheduled is usually just unexpected routing through ceiling cavities -- not a defect.
Miswire at patch panel
When multiple cables are terminated on the same patch panel block, it is easy to swap pairs between adjacent ports. Re-punch the panel and verify each port matches its cable.
Failed throughput at full speed
Cable passes wiremap and length but fails 1G or 2.5G throughput testing. Causes: poor quality patch cable in the test path (replace with known-good), excessive untwist at termination (re-terminate keeping less than 0.5 inch untwisted), damaged cable in the run (TDR to find fault location), or too many jacks/couplers in the channel exceeding the 4-connector limit.
Client Documentation Package
The deliverable to your client should include the following items, packaged in a single PDF or zip file:
1. Cover sheet
One page with: project name, site address, install date, your company contact info, total drops, summary of test results (X drops passed, Y drops failed, Z drops rerun and now passing), warranty period offered, and a "as-built" note describing any deviations from the original design.
2. Cable schedule
Spreadsheet or table listing every drop: drop number, room/location, patch panel port, cable category, measured length, wiremap result, throughput result, and notes. This is the document your client (or their next IT vendor) will reference for any future work.
3. Test reports
PDF outputs from your speed certifier for each drop. The Net Chaser generates these directly. If you used a basic tester without report export, take photos of the test screen showing the pass result for each drop.
4. Photos of finished work
Patch panel front and back (showing cable dressing), any wall-plate locations with unusual installations, and the equipment closet overall. Useful for warranty disputes and for your own reference.
5. Warranty terms
State the warranty: typically 1-3 years on workmanship, manufacturer's warranty on cable and components, what conditions void the warranty (physical damage, modifications, etc.).
Frequently Asked Questions
Do small office installations require formal TIA certification?
Most small office installs do not require formal TIA-568 certification unless the contract specifies it. Qualification testing with documented wiremap, length, and throughput verification is typically sufficient. See our guide on when certification is required for the full breakdown.
How long does it take to test a 25-drop small office network?
Plan on 2-4 minutes per drop for verification with a tool like the VDV MapMaster 3.0, plus 1-2 minutes for throughput validation with a Net Chaser. For 25 drops, expect 90 minutes to 2.5 hours including documentation.
What documentation should I leave with a small office client?
Cover sheet with project info and pass/fail summary, cable schedule listing every drop with location and test results, PDF test reports from your speed certifier, photos of finished work, and stated warranty terms. Save a copy for your records.
What is the most common failure on small office installs?
Split pairs at the keystone jack, followed by miswires at the patch panel and cables exceeding 100-meter channel limits. Basic LED testers will not catch split pairs, which is why a wiremap-aware tester like the VDV MapMaster 3.0 is essential even on small jobs.
Build Your Small Office Test Kit
Everything you need to test, validate, and document a small office cable plant in one trip.